Managing supplies for your clients - the Inventory menu
In case you need a platform where your clients can buy your supplies (envelopes, boxes, labels, etc.) and have them shipped to your clients as well, our application can provide you with the tools to do this easily.
This manual provides you with information on
- Ordering supplies from a client’s point of view.
- Processing orders received from clients, from an employee’s point of view.
- All the settings required to have this process functioning.
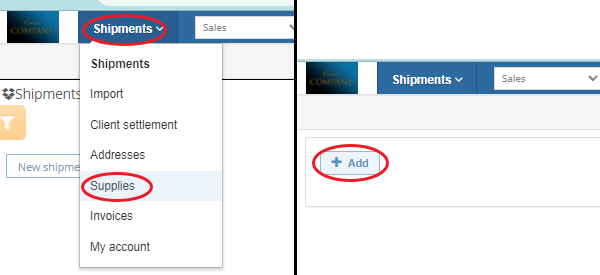
- Ordering supplies (as a client)
The client makes an order from his account the following way:
They go to Shipments>Supplies, then press the +Add button.
The new page will be an overview of the order. They can pick the department that will receive the order and edit the quantity of each product they require. Right now, the status of the order is draft.
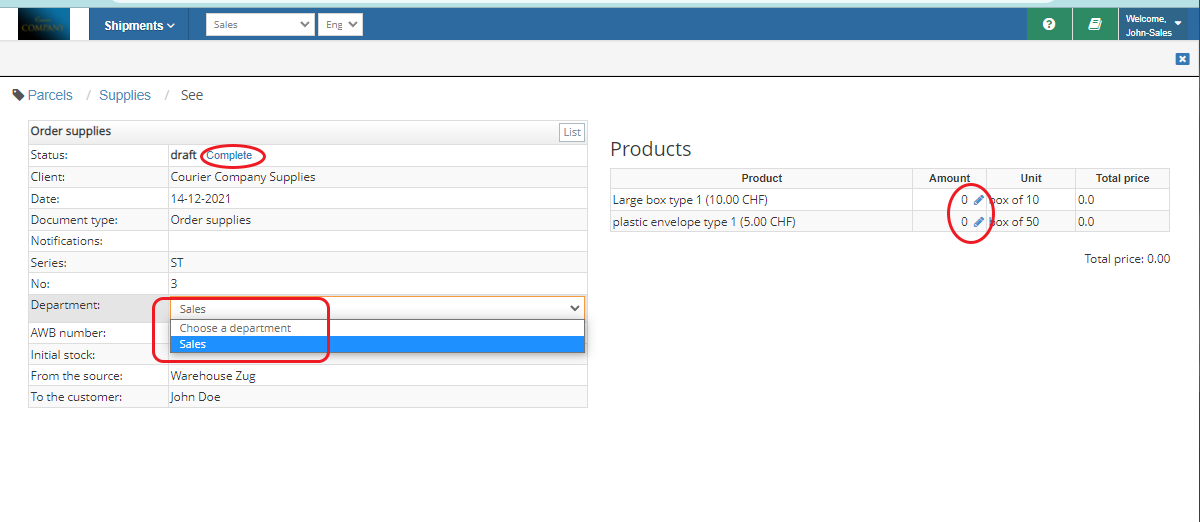
After the needed changes are done, they can click on Complete. The order is sent to the courier company and its status will be changed to pending.
- Processing orders (as an employee)
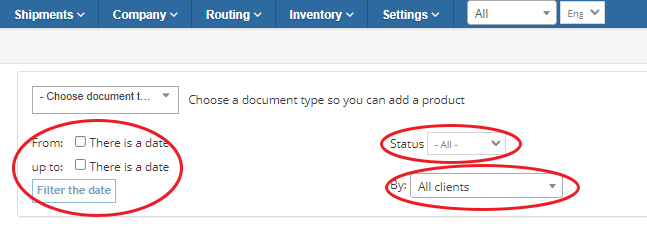
Go to Inventory>Transfers. This is the main interface in which you can see all the incoming orders. It includes a Date filter option (to view orders from a certain date), a Status filter option (to view orders based on their current status), and a Client select option (to view orders sent to a particular client).
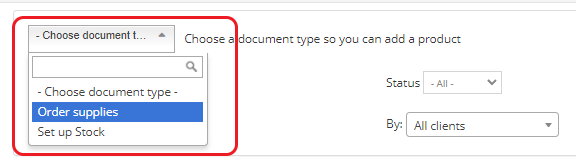
You also have the option of adding an order for a client yourself by selecting the corresponding document type. After that, just press +Add.
After that, on the new page, you can add comments, the series and number of the document, the warehouse the order will be shipped from and, very important, the client that will receive it.
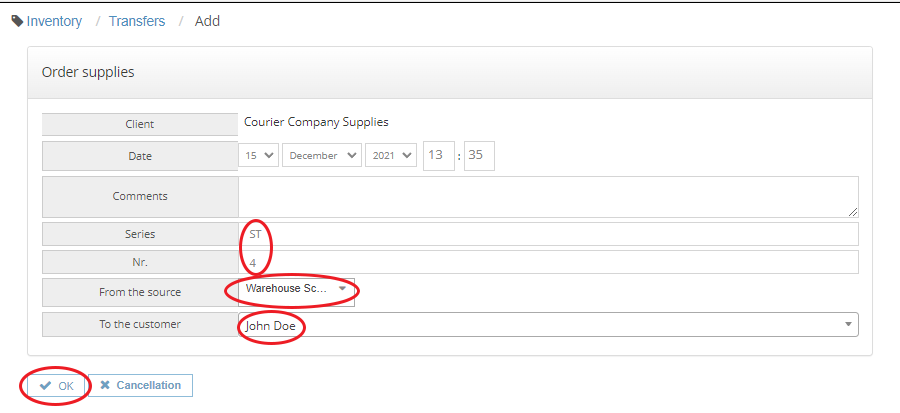
Once you click OK, you have created the order and it can be changed and edited as any other order that came from your clients.
Orders received from your clients will show up in the list with the status pending.
In the Inventory>Transfers list, click the View magnifying glass icon on the row of the order in order to see and modify it.
You can review the order, add a customer discount or change the department of your client that will receive the order; if you need to change the quantity of the products, change the status to draft. At the end, you can create a shipment and issue an invoice (you will then see their names and link to each respectively), and change the status of the order as you wish.
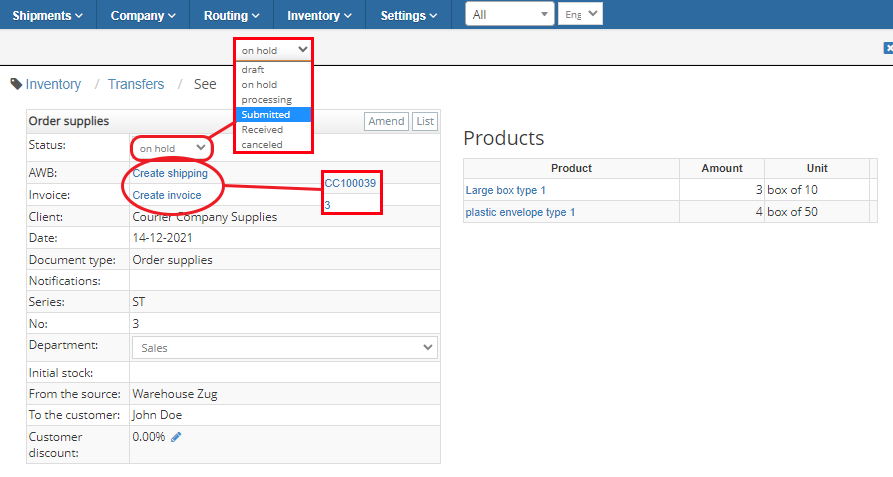
If you click on the shipment number, you will be taken to it and if you click on the invoice number, you will have the possibility to see it, print it, send it, etc.
You can also print the shipment number, transfer sheet and invoice using the print option from the Transfers interface.

Status list:
Draft: The order was added, in this stage you can change the quantity of the products.
Pending: The order was completed and is awaiting processing.
On hold: The order is oh hold.
Processing:The order is being processed.
Submitted: The order was sent.
Received: The order was received by the customer.
Canceled: The order was canceled.
You can bulk change the status of certain orders from the Transfers interface.
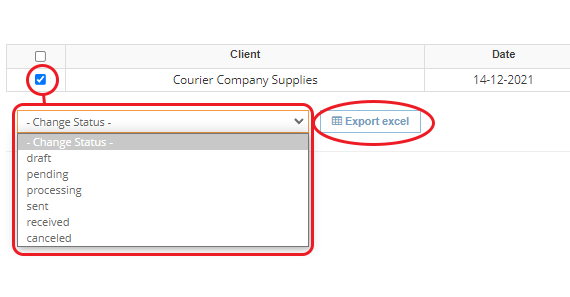
Select your orders and use the Change status select option. Press Ok on the prompt window.
You can also export an Excel sheet with the orders, in case you need to.
- Set up steps for supply orders
There are 4 steps to perform before being able to use the Supplies/Inventory menu properly:
- Create a Supplies client and set it up to manage your inventory
- Add Document types, Locations, your products and your product categories.
- Add users and departments for your own clients and manage their rights, so they can order the supplies by themselves.
Let’s take them one by one:
- Create a Supplies client and set it up to manage your inventory
This one is an account owned by your company as well, but you create it under the category Clients, so you can create shipments directly from it.
Go to Company>Clients and press +Add.

Name this new “client” however you want, as long as you remember afterwards that it is used for your supply chain. For example, Courier Company here has created a user called Courier Company Supplies.
Next, you need to set this client as your supplies' handler.
Go to Settings as follows
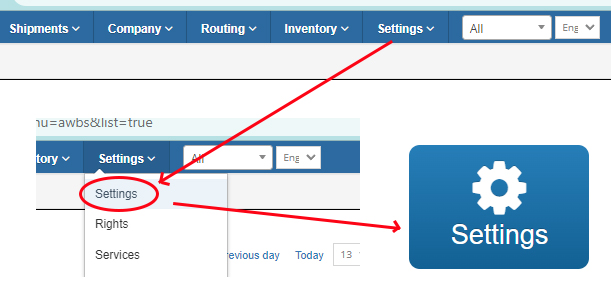
and scroll down to Inventory. There you can pick them as your Supplies client.
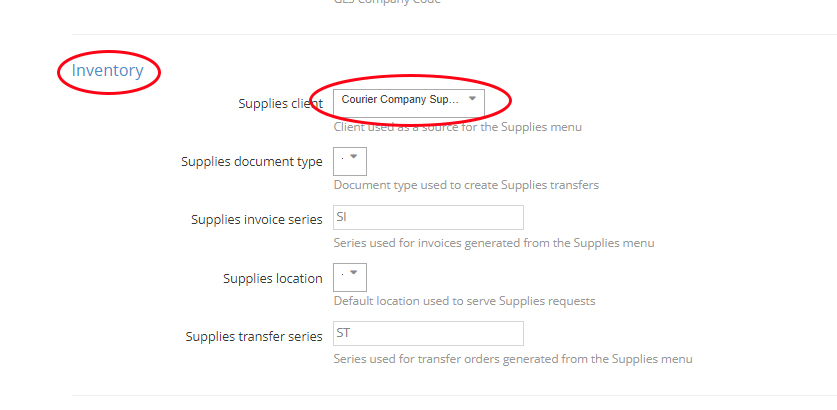
Make sure you scroll all the way down and press Edit settings in order to save your choice.
- Add Product categories, Products, Document types and Locations.
You manage all of these from the main menu called Inventory.
If you want to have several categories for your products, go to Inventory>Product categories.
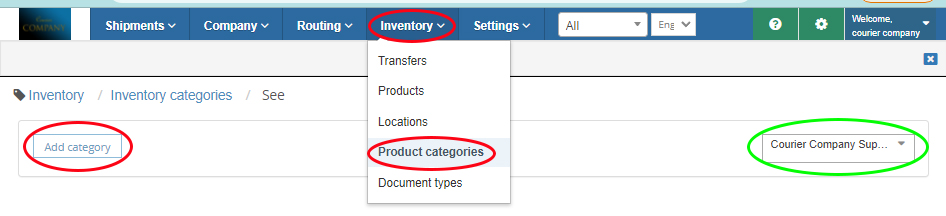
Please note that on the right, the client these products/categories are being added for is The same one set as Supplies Client set up earlier (in this case, Courier Company Supplies).
To add new products, go to Inventory>Products>Add.
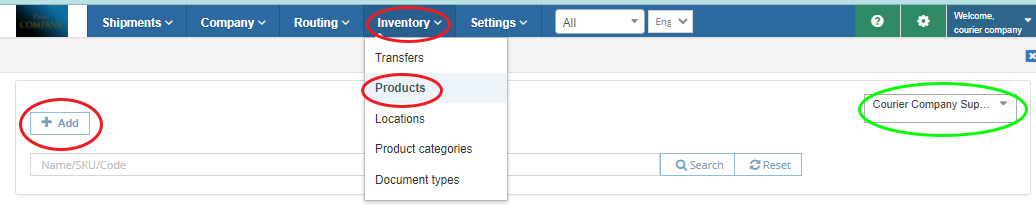
Fill in the name of your product; you can add a description, choose a category - if you have categories created, write the type of measuring unit (box, bag, piece, etc.) you have in Unit, choose a price and a weight, etc. Press OK to save.
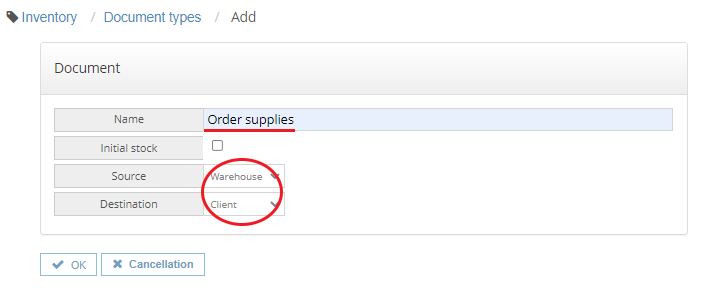
Go to Inventory>Document types. Here you can set up different types of documents used in this commercial chain.
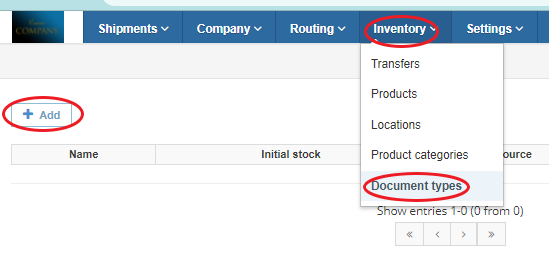
Normally, you should add at least two types of documents: one that will become an order created by the client (or yourself, if there is the case), and another one that will be a document adding more products to your stock.
When you create the Supply Order Document, write its name, do not tick the Initial stock box; for source pick Warehouse (since the supplies will leave from your warehouses) and for Destination, pick Client (since that is where they will end up at).
The document type used to create an order (Order supplies in our case) will also be added to the Supplies document type field from Settings>Settings>Settings>Inventory (where we previously picked the Supplies Client).
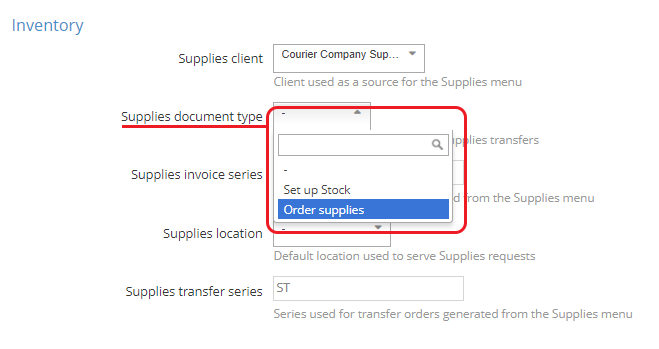
There you can also set series names for your invoices or order documents and set a default location for your supplies, if you have one (see setting up Locations below)
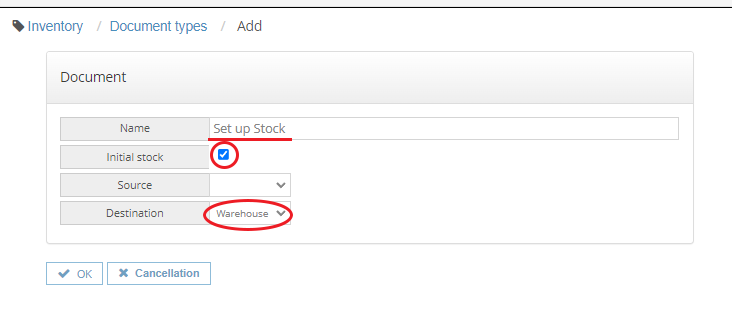
When adding the document used to add stock (let’s call it Set up Stock), write its name, tick the Initial stock box. Picking a source is not important, but for destination, select Warehouse.
Lastly, go to Inventory>Locations>+Add to put in the warehouses (or other places) where the supplies will be delivered from. This will also allow you to add specific stock for each warehouse you have.
This is how you add new stock to your warehouse:
Go to Inventory>Transfers, then choose the document that you created for setting up stock, then click +Add.
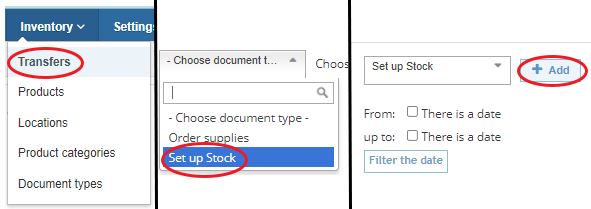
You can change the date and time, add extra comments, add a series and a number and, very important, you need to select to which warehouse you want this stock to be added to.
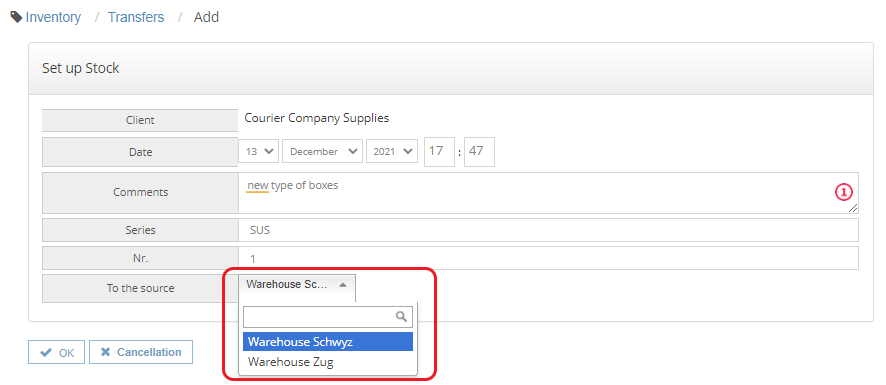
After clicking OK, you will be taken to a page where you can add the products you need, and then change the status to whatever you need (see photo). The in initial status is always draft.
By pressing List, you can always see the whole list of Set up stock documents, and also , check each of them, edit, delete or print.

Add users and departments for your own clients and manage their rights, so they can order the supplies by themselves.
You want your clients to be able to order the supplies they need without any help from you, and for that you need to set up users for them.
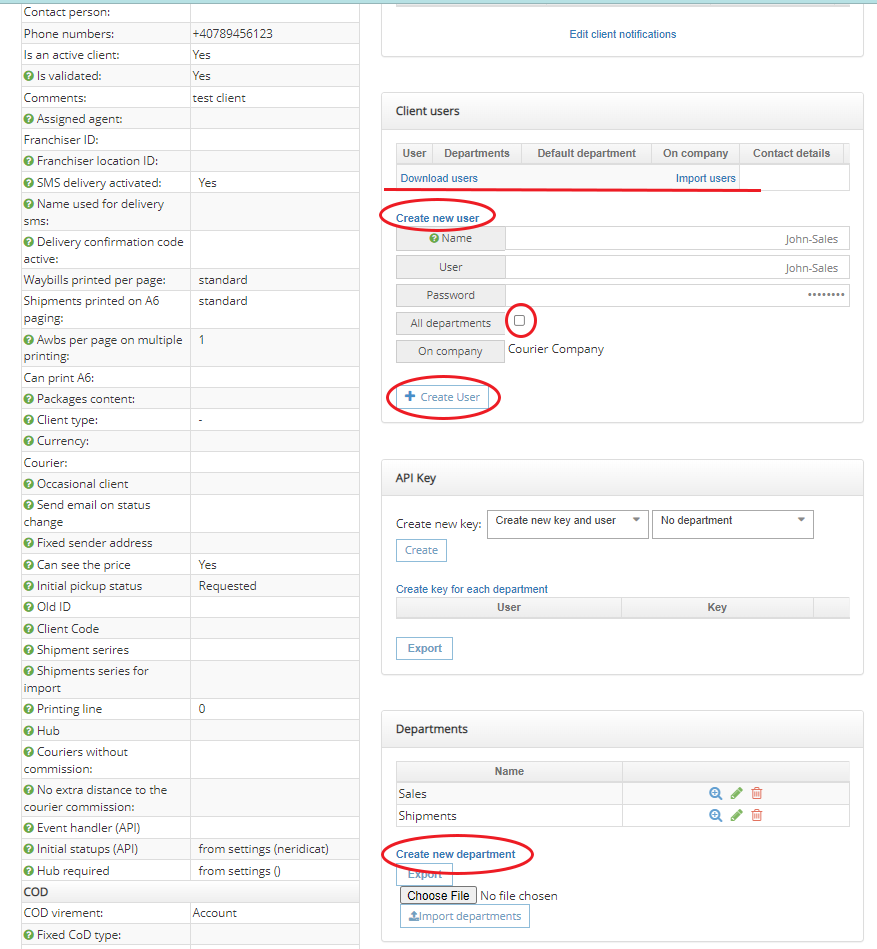
Go to Company>Clients. Search for the client you are looking for and click the “View” blue magnifying glass icon at the right end of its row.
You will now see detailed information regarding your client. On the right side of the page, you can add departments and users. Even if your clients don’t have departments, it is good to create one by default.
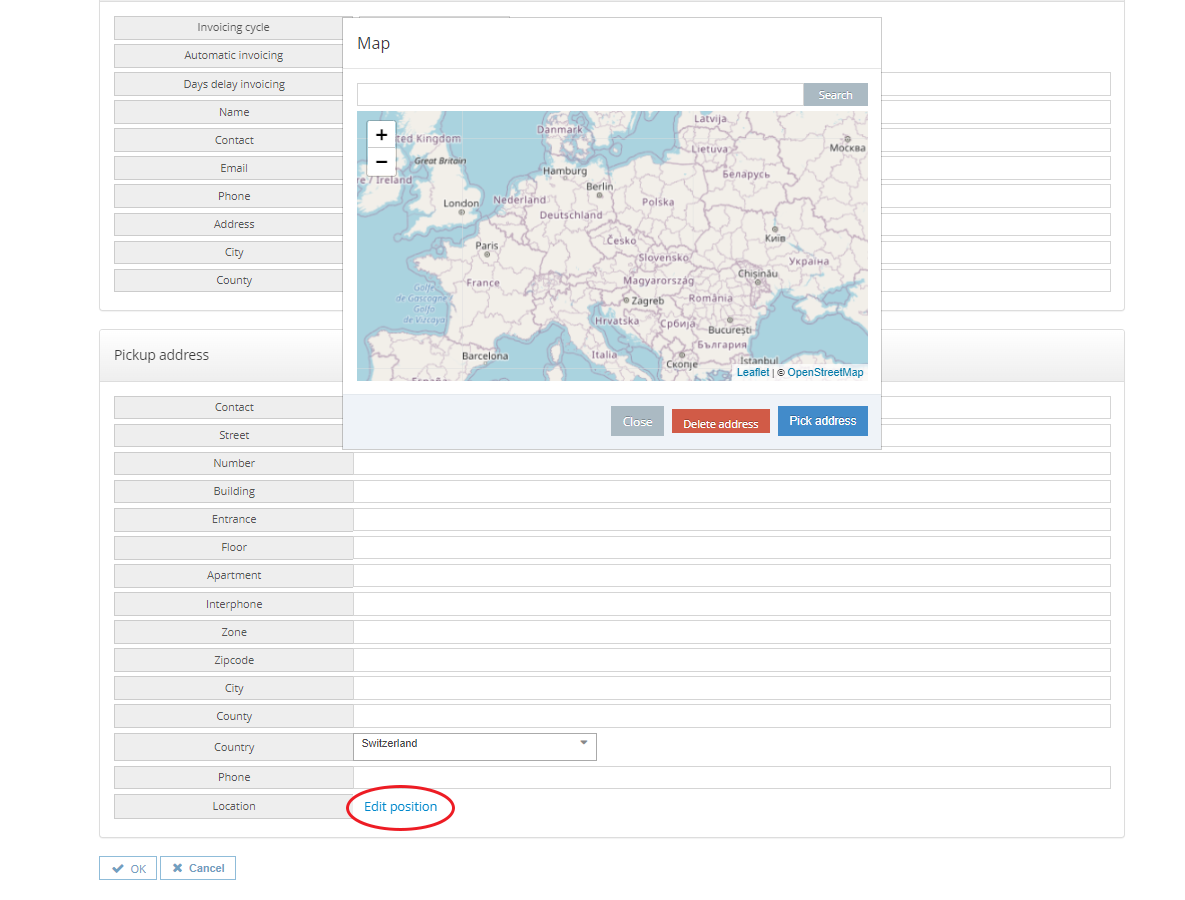
When creating a department, it is important to choose a name and to edit a position for it (since different departments could be located at different addresses).
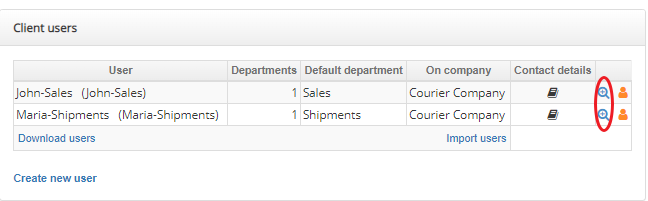
When adding a new user, please make sure you create a unique User. You can attribute the users to all created departments, or you can later choose manually what specific departments the user belongs to (by clicking the “View” magnifying glass icon once the user has been created).
If you have to create a big number of users, you can always Download users and use the file to fill in all the new users and then use Import users to add them to the list.
You now need to set specific rights to the clients’ users who purchase supplies from you:
Go tot Company>Clients, search for the client you need and click on its name. In the list of users you created for a company, you can click the View magnifying glass icon at the right end of the row and see their profile.
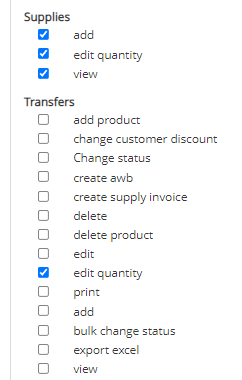
There, click Edit under Personal rights. Scroll down until you reach the titles Supplies and Transfers. Tick all the boxes in the former, and tick edit quantity in the latter.
Scroll all the way down and press the Modify rights button.
If specific employees of yours will be handling the orders, make sure they have the same rights ticked, plus others you might need (such as change customer discount, change status, create AWB, create supply invoice, etc.). Most of the rights in Transfers will be useful in handling customer orders.